Showing posts with label Gift tag. Show all posts

Monday, June 14

Father's cards.

Lots of great Challenges going on the week.  And a few of them are for Fathers day!
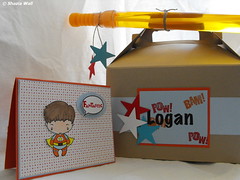
I have decided to make a Card set for my husband's father's day. I always tell him to keep some card at work "just in case" but I always forget to give him the cards! LOL here is the set I made 
The set includes:
1 birthday card 1 postcard and 1 tag
2 congratulation cards
1 Dear father card and 1 tag
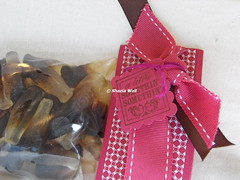
Envelopes and a matching box
I also used Laura's Sketch 54 for this card below!
I am sure this set will be used up and waiting for replacements in no time!

Happy Krafting, Shaz

p.s. I {heart} comments!
Recipe:
Tools: paper Trimmer, EK Success, border punch. EK Success,
Paper: DP and Chocolate chip, SU! Outdoor denim and sage, CTMH.
Stamps:well scripted and time for you, SU!
Embellishments: twine
Colors: Basic Brown, SU! outdoor denim, CTMH.

Wednesday, April 14

Amazing Party gift!

Hello friends,
My two younger girls have a boy birthday party to go to this week-end. They are so excited to go to a Train themed party. I wrapped up the gifts and made a card for the boys. They are twins so I got to make two ... HOW FUN!
For the card I used Get Sketchy! Our Go-to Sketches Week Challenge! over at the Moxie Fab blog.
I found these Boxes in my storage bid. I swapped them at the Scrap week-end lasts spring.
I am adding this to the Greeting Farms Farm Fresh Fridays are Spring Cleaning

Happy Krafting, Shaz
p.s. I {heart} comments!

Recipe:
Tools: Large star punch,Wide oval punch, SU!
Paper: tangerine, Bashful blue, real red, Bermuda cardstock, SU!. polka dot DT, SU!. White cardstock, CTMH.
Stamps: Amazing duo, The Greeting Farm.
Embellishments: twine, May arts. Speech bubble, clipart.
Colors: Jet black, Staz-on ink. tangerine, Real red, ink SU! Markers, Copic.

Wednesday, April 7

Cola goodies


A good friend of mine had a birthday this passed week and she love Coca~Cola!


I had to make her a little treat to celebrate. So, I made her a bag of Cola gummies with a cute topper.
These little cola gummies are so yummy.  Even Grandma asked if she could have some!
I am also adding his creation to the EBTKS Challenge 12- String.

Happy Krafting, Shaz
p.s. I {heart} comments!


Thursday, December 17

Wrapping the perfect gift

I thought I would share 2 unique ideas for wrapping the perfect gift.
I am down to five gifts to be wrapped, Yeah for me!
Here is what I have done wrapping the perfect gift cards
For wrapping the perfect gift cards I created a passport folder to hold 2 gift cards and a card. 
The card and holder is for my husband so I tied to stay away from glitter and flowers. 

The card is based on Laura's Sketch 41.  I used 2 tutorial for the passport folder.
The second ideas is for wrapping the perfect gift basket.

I love gift baskets but I always think the stuff in them is a little weird and expensive too!
I saw some that look great but the had an ugly bowl. I would never want to see some of those bowls
after I eat all the goodies. So I wrapping the perfect gift basket and it only cost $3.00. YES, wrapping the perfect gift basket only cost $3.00! 
I went to the dollar store and picked cello wrapping, tinsel and the ornament for $1.00 each.
I hope you liked my ides on wrapping the perfect gift!


If you have any question please feel welcome to leave a comment.
Have a Merry Christmas!
~*~Shaz~*~

Friday, December 11

Christmas gift package

The Greeting Farm had a great Challenge for "the complete package", and boy was I stumped. After much thought I came up with this ...

These tins and book clip coordinate with the gift holder I made on my blog-aversary post. {here}
They are a Christmas Gift for my "Mommy-Buddy".  I stamped and colored Anya's head for tags to embellish the tins. I put a eyelet in the hat  to lace the tags to the tins.
The packaging is a re-use package from my birthday. I re-moved the original labels and replaced them with hand-stamp labels. {check out the close ups}


I also wanted to let you all know that there is a sale over at Purple Onion Design Stamps are 25% off until Dec 15th! You could also enter a draw over at the blog by post the blinkie like me. Head on over!


If you have any question please feel welcome to leave a comment.


Have a wonderful day~Shaz

Monday, December 7

piles of glitter

Why is glitter so messy? I have done an other Pile it on challenge... and this was a messy one. Check out the pile of Challenges I used:
{1}Pile it on challenged us to use Glitter.
{2}  Sketch Saturday gave us the layout
{3} Farm Fresh Friday Color combo
{4} Crafty Cardmaking Non Christmas image on your Christmas card.
I had the grand idea to use the Laundry Hope {see the original image here} to make a tired gift wrapper.  I am sure I will look like this next week, all strung out on wrapping, apple cider and curly ribbon. Can you see her tiny slippers? I have not seen a challenge for flocking but if there was one I would qualify. I dusted her little house slippers with soft white fluff. So while "Hope" pulls an all-night-er, wrapping gifts, her toes will keep toasty.


{material}
Baja, kiwi, real red, choc chip and whisper white card-stock from SU! Laundry Hope stamped image is from TGF and embossed with stazon and SU! clear powder.. Gold glitter is from White Rose{if you even know the place I have had this glitter forever}  Christmas sentiment, ribbons and strings are random from my stash. Colored with Copic markers.
{tools}
Crop-o-dile to punch hole in tag. Making Memories Slice and Noteworthy SD card to cut dies.  Glue pen and Liquid glass from CTMH to adhere glitter and flocking. Heat gun to set the embossing powder and glues.
If you have any question please feel welcome to leave a comment.

Have a wonderful day~Shaz

Wednesday, December 2

Cherry Blog-aversary to me!

Today is My Blog-aversary and I am sure you saw the giveaway to celebrate. Today is the Last Chance to enter for the draw, So click here to enter. Hank and I were talking about it earlier in that week. It does not seem that long since I started blogging. I totally enjoy the comments and ideas I see while I blog. Some blogs are my new crafting buddies. Like... the gang over at The Color Throwdown!
Have you seen the color throw-down challenge today?
I am sure it would be great for a Christmas card but I had a little gift I needed to wrap. The gift has cherries on the package that totally matched the throw-down colors! So with the help of the ladies over at The color Thow-down... I made a pocket to hold the gift I picked up for a Mommy-buddy.
Most of the stuff I used here is in the blog-candy package.

{material}
Sentiment stamp, designer paper, black, green, red. and white card-stock are from SU!
Red pearls, ribbon & floss can be found at Hobby Lobby. Vintage charm is a found item.
{tools}
Shapes cut with the Noteworthy Sd card for the Making Memories Slice.
Round tab, small oval & curly label punch from SU!
If you have any question please feel welcome to leave a comment.
Have a wonderful day,
Shaz

Tuesday, September 29

card{clip} w/ tutorial

You may remember I made this card for a splitcoaststampers sketch challenge. I love the way the card worked out it was just perfect. Now it is time for me to give my card to a dear friend my cards away seems to be the hardest thing for me. {I think that is why I Scrap-booking better...lol} I didn't want to hide it in an envelope. So, I came up with this card clip!

To make a Card clip...
I used:
a clothes peg. scrap paper. adhesive. embellishments and
glazing solution like Liquidglass/CrystalEffects
Here is how:
1. Take a scrap on the designer paper. Measure it to cover the face of the peg. I cut it slightly bigger than the face of the peg, for an over hang.
2. Smother the front of your peg with adhesive. I used a tape runner to do this. A couple of runs over the face of the peg did a good job.
3. Position the paper over the glue and press firm. Now for that slight over hang... you could file/sand it down but I just folded it down to surround the face's edge.
4. You will want to lay the peg on a flat surface for this. Take your Liquidglass/CrystalEffects type of glazing solution and trace the face of the peg following the edge of the peg.
This will create a wall to hold in the glazing solution.
5. Fill in the walls with the glazing solution and trace the outer edge of the wall as well. This will seal the paper so be sure that you are covering the paper and peg at the same time.
6. Embellish! I used buttons, but anything goes. I placed the buttons on just before the glaze solution dried but you could wait over night and then adhere your embellishments.

Et Voila!


Monday, September 7

Spooky{tag}


Here she is! Fhiona with a cute Halloween costume. This is a witch that you would love to see tied on a treat or with a note just to say : “Have a great day!”
I stamped some friends for Fhiona in the background. The spider has a tiny paper pierced trail leading up to Fhiona. The ghost is a simple white outline, like a ghost should be.

The colors used for this tag are from Dawn McVeys’ Raspberry Suite color Challenge #16. I love the rich palette Dawn always picks. She has a great sense of style.
{materials}
kraft and white cardstock. markers. white and brown ink. Yournextstamp Fhiona image. yellow grosgrain ribbon and brown satin ribbon. The tag was cut with the MM slice.

Have a great day,
Shaz

P.S. I {heart} comments.

Tuesday, July 28

Stamp{news}

Today's Headline: Shaz is a Designer for "YourNextStamp"!
YourNextStamp is a brand new Canadian Stamp company with some of the cutest stamps.
Today I have a super sneak peak at a stamp that will be debuting this summer.
These classy little stamps are so fun to work with that I had to make his and hers card.

Jump over to the YourNextStamp and be the first to have these great stamps. The site will be opening soon so keep an eye on it!

Happy Krafting!
Shaz

Thursday, February 19

Last of Heart day


I just wanted to post the last of the Valentines. Here they are:

The energy drinks were for my 3 brothers. I was not sure I wanted to give them chocolate so I got these from a bulk store. I used a lot of imagination to make them match the pictures on the cans. Details: These were free-hand tags. I used rhinestones googly eyes and curly ribbon.

The slider cards are for my kids with red popcorn inside. A Great family friend had some at Christmas I was so happy to find it for Valentines! I used a paisley back-ground stamp to create the base of the card. Details: Always SU! stamp set, Real red ink,Red satin ribbon Wal-mart 1 3/8th circle punch and scalloped edger. Red popcorn from "Krenels". Base measures 1 inch wider and 1/4 taller than package of popcorn.

My kids made the nano Mp3 card. They chose the songs for the play lists. They loved punching out the pieces and gluing them together. Details:3X 31/2 card base, 2X21/2" screen, 1 3/8" circle, 3/4" circle, and a heart punch.

Hope you are still filling the LoVe,
Shaz

Wednesday, December 3

Onesie Gift Tag

My favorite thing about Paper craft blogs is Tutorials! So here is one. I made these tags for a babies Christmas gifts. You may have seen the onesie cards around well I have changed the measurements to make gift tags. You will need:
2 in X 6 in piece of paper
Small hole punch
Small oval punch
Embellishments(your pick)

1st- fold you paper to measure 2 X 3, With you fold on the top.
2nd- One the Back. Mark the sleeves 1/2 inch X 1 inch on each side. You will also need to draw a line from the "armpit" to the "hip" of the Onesie. Cut these lines out.
3rd-At the open end Mark 1 in in the center. This marking will guide your oval punch for the leg holes.
4th- You need to mark the center at the top (were your fold is) for the neck. Using you punch unside-down is the best way to line things up.
5th-Punch the legs out. Holding the punch upside-down will allow you to see the marks you made to guide your sizing.Punch about a 1/4 of the oval.
6th-You will want to place a small hole on the back "shoulder" area for your string. Simply tread it and make a knot. 7th- Punch out the neck. Use the center mark you made to cut half of the oval.
You can turn it over and decorate it, now. I just added a little snowflake brad.
Cute, eh!
ShaZ